An account must be created for each player before they can log into your server and observe or play at any of your poker tables. You can configure your system to allow players to create their own accounts from the player client module (see the "Allow New Accounts" setting on the System tab in the Account Settings group). Otherwise, you can manually create player accounts on the Accounts tab in the Admin Console. This tab contains a list of all player accounts in your system and a toolbar of commands to manage those accounts.

Select Modes - Some of the functions described below can be performed on multiple accounts at once. Use the select modes shown at the bottom of the grid:
Grid Configuration - Click the Config button in the lower right corner to adjust the column order in the grid and to specify which columns to show or hide. These settings are saved in the AdminData.db database and will be remembered on subsequent logins.
Add - Click the Add button on the toolbar to add a new player account to your site. An input form will be displayed as shown below. Click in any field and a description of that property will be displayed in the yellow box.

Account Properties
Player - Enter a unique player name, up to 12 characters. The player name can only consist of letters, numbers, dashes, and underscores.
Creator - Name of the admin account that created account (will be "Administrator" in Lite/Pro editions). Will be blank for self-created accounts (i.e., account created by the player in the client interface).
Admin profile - This is a admin profile name that allows the player to login into the Admin Console (using their player name and password) and perform administation tasks as allowed in the profile. A blank value indicates no admin rights. Admin profiles are created on the System tab with the "Admin" button. This feature is only available in the Gold edition.
Title - This is an optional parameter (0 to 15 characters) that can be used to identify a player with a specific site title (moderator, banker, administrator, etc.). The title appears in the player's mouseover hint when seated at a table. It will also show in the chat boxes when "Show player title in chat" is enabled in the system settings.
Level - This is an optional parameter (0 to 50 characters) that can be used to identify a player's level or ranking as a player based on parameters determined by the site administrator. The level appears in the player's mouseover hint when seated at a table.
Real name - Enter the player's real name, up to 50 characters. This field can be made optional on the System tab.
Password hash - Enter the password for this player. It will be saved as a secure, one-way hash.
Gender - This indicates the gender of the player: Male, Female, or Unspecified. This field can be made optional on the System tab.
Location - Enter the player's location (e.g., City/State/Country, etc.), up to 50 characters. This field can be made optional on the System tab.
Balance - This is the player's primary account balance. The initial value is automatically set to the default "Starting balance" value specified in the System settings. Avoid editing this field while the player is logged in, as they could join or leave a table while the edit dialog is displayed. Instead, use the Chips commands as described below.
Balance2 - This is the player's secondary account balance. The initial value is automatically set to the default "Starting balance 2" value specified in the System settings. Avoid editing this field while the player is logged in, as they could join or leave a table while the edit dialog is displayed. Instead, use the Chips commands as described below. Secondary currency is only available in the Gold edition.
Last reset - This is the date and time that the player's primary balance was last reset.
Last reset2 - This is the date and time that the player's secondary balance was last reset.
Permissions - This is a comma-separated list of permission tokens that give players who have a matching token access to restricted ring tables, tournaments, and chat. Tokens are case-sensitive and up to 15 alphanumeric characters in length.
Tickets - This is a comma-separated list of ticket tokens, given as prizes from satellite tournaments for entry into other tournaments. Tokens are case-sensitive and up to 15 alphanumeric characters in length.
Chips transfer - Set to Yes to allow player to transfer primary balance chips to other players from lobby menu. "Allow primary chip transfers" on the System tab must also be enabled.
Chips transfer2 - Set to Yes to allow player to transfer secondary chips to other players from lobby menu. "Allow secondary chip transfers" on the System tab must also be enabled.
Chips accept - Set to Yes to allow player to accept primary chip transfers from other players. "Allow primary chip transfers" on the System tab must also be enabled.
Chips accept2 - Set to Yes to allow player to accept secondary chip transfers from other players. "Allow secondary chip transfers" on the System tab must also be enabled.
Suspend - Set to 0000-00-00 00:00 to enable player login or set to a date & time in the future when login privileges will be automatically reinstated. Set to 9999-99-99 99:99 to indicate an indefinite suspension.
Chat - This is the date and time that a player's chat privileges will become active. The default value is 0000-00-00 00:00 indicating that chat privileges are active now. Set to a future time to suspend chat privileges or use 9999-99-99 99:99 for an indefinite ban.
Chat color 1 - This is an optional setting that determines the player's chat color (#RRGGBB format) in the lobby window and when seated at a table. Click the "<" button to visually set the color with the color selection utility. Leave blank to use the default "Player chat color" setting specified in the system settings.
Chat color 2 - This is an optional setting that determines the player's chat color (#RRGGBB format) when they are an observer at a table. Click the "<" button to visually set the color with the color selection utility. Leave blank to use the default "Observer chat color" setting specified in the system settings.
First login - This is the date and time that the player first logged into your site. It is initially set to all zeros.
Last login - This is the date and time that the player last logged into your site. It is initially set to all zeros.
Logins - This is the number of times the player has logged into your site.
Email - Enter the player's email address.
Val code - This is a random validation code created and sent by the server to the player's email address when "Validate email addresses" or "Allow password recovery" is set to Yes in the System settings. This field is erased automatically once the account is validated.
Avatar index - Select one of the available avatars from the communal set by its index number to represent the player at the table. The default set includes 64 avatars. Pro and Gold edition users can replace the default set using the Avatar Folder system setting. Set the value to 0 to assign a custom avatar file to the player, outside of the communal set.
Avatar file - This is an optional (Pro/Gold only) setting that assigns a specific GIF, PNG, or JPG file to the player as their avatar. The recommended size is 64 x 64 pixels but any image with a 1.0 aspect ratio can be used. This setting is ignored if the Avatar Index value is not set to 0.
Custom1 - This is an optional field, up to 100 characters. The caption is determined by the "Custom field #1" property located in the Account Settings group on the System tab. This field can also be made public (unlike Custom2 to Custom5).
Custom2 - This is an optional field, up to 100 characters. The caption is determined by the "Custom field #2" property located in the Account Settings group on the System tab.
Custom3 - This is an optional field, up to 100 characters. The caption is determined by the "Custom field #3" property located in the Account Settings group on the System tab.
Custom4 - This is an optional field, up to 100 characters. The caption is determined by the "Custom field #4" property located in the Account Settings group on the System tab.
Custom5 - This is an optional field, up to 100 characters. The caption is determined by the "Custom field #5" property located in the Account Settings group on the System tab.
Note - An optional note, up to 250 characters. The players cannot see this field.
ERake - Player's accumulated primary currency rake contributions, calculated via the equal distribution method where everyone dealt in the hand is assigned an equal portion regardless of how many chips they put in the pot.
ERake2 - Player's accumulated secondary currency rake contributions, calculated via the equal distribution method where everyone dealt in the hand is assigned an equal portion regardless of how many chips they put in the pot.
PRake - Player's accumulated primary currency rake contributions, calculated via the proportional distribution method where the amount assigned to the player is based on how many chips they put in the pot.
PRake2 - Player's accumulated secondary currency rake contributions, calculated via the proportional distribution method where the amount assigned to the player is based on how many chips they put in the pot.
TFees - Player's accumulated primary currency tournament fee contributions. This includes fees on buy-ins, rebuys, and add-ons.
TFees2 - Player's accumulated secondary currency tournament fee contributions. This includes fees on buy-ins, rebuys, and add-ons.
Clone - Click the Clone button on the toolbar to add a new account and initialize its settings using the settings of an existing account that is selected in the list.
Edit - Click this button on the toolbar to edit the account properties of the selected player(s). You should avoid making changes to an account when the player is currently logged in. When editing multiple accounts at once, fields not modified will keep their original values.
Delete - Click the Delete button to delete the selected player accounts. You cannot delete accounts for players that are currently logged into your server.
Import - Click the Import button to add player accounts or player notes previously saved to a file with the Export button. When importing accounts, player names cannot already exist or else you will see an error message. When importing player notes, an account for that player must already exist, and you have the choice to Replace or Append the notes. With the Replace option, all existing notes (including chat blocks and color labels) authored by the player found in the import file will be deleted before any new notes are imported. Existing accounts are not affected if their names are not in the import file.
Export - Click the Export button to save the selected player accounts or player notes to a file in JSON format. This function can be used for backup purposes or to transfer to another server. Player notes are the notes that players make in the client interface about other players. These notes are stored in an encrypted format and kept in a PlayerData.db database file separate from the account settings and are not related to the "Note" field in the account settings. You may also export selected player email addresses to a text file with this button.
House - Click the House button to show the current balance of all house accounts. The Gold edition has separate accounts for the secondary currency:
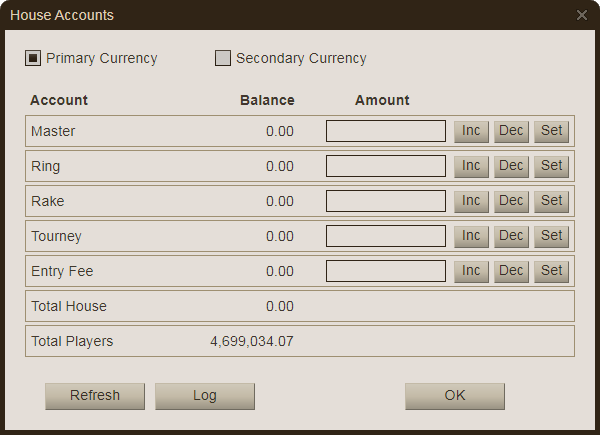
Master - this account tracks the sum total of all house-to-player chip transactions, including chips given to new players, free chips granted by request, and manual player balance changes from the console and API calls. Chips manually removed from players (including balances from deleted accounts) are added back to this account and chips added to player accounts are deducted from this account.
Ring - this account keeps a real-time total of chip stacks at all ring tables. As pots are rakes, the raked chips move from the Ring account to the Rake account.
Rake - this account keeps an accumulation of all chips raked from the ring tables.
Tourney - this account keeps a real-time total of buy-in chips less the prizepool chips as they are awarded. The entry fee portion of the buy-in/rebuys/add-on goes directly to the Entry Fee account. The Tourney account can show a negative balance if prize bonuses are set.
Entry Fee - this account keeps an accumulation of all entry fees collected on tournament buy-ins, rebuys, and add-ons.
Total House - this is simply a sum total of all house accounts.
Total Players - this account keeps a real-time total of all player balances. This particular account is "read-only" and recalculates each time the server is started and player accounts are loaded from the database file.
Use the Increment, Decrement, or Set buttons to adjust balances by the amount specified. Use the Log button to record the current balances in the event log.
Chips - Click the Chips button to display a menu of commands for adjusting chip balances of all selected players. This method is safe to use even while players are logged in and playing. The follow commands are available:
Set primary balance - set the primary balance to the desired chip count for all selected players.
Increment primary balance - adds the desired number of chips to each selected player's primary balance.
Decrement primary balance - subtracts the desired number of chips from each selected player's primary balance. Three options are available here: "Allow neg" will subtract the chips even if the resulting balance is below 0. "Zero if neg" will subtract the chips but if this results in a negative balance then the account will be reset to 0 automatically. "Skip if neg" will only subtract chips if the resulting balance is 0 or more, otherwise no chips are subtracted from the account.
Set secondary balance - set the secondary balance (Gold edition) to the desired chip count for all selected players.
Increment secondary balance - adds the desired number of chips to each selected player's secondary balance (Gold edition).
Decrement secondary balance - subtracts the desired number of chips from each selected player's secondary balance (Gold edition). Three options are available here: "Allow neg" will subtract the chips even if the resulting balance is below 0. "Zero if neg" will subtract the chips but if this results in a negative balance then the account will be reset to 0 automatically. "Skip if neg" will only subtract chips if the resulting balance is 0 or more, otherwise no chips are subtracted from the account.
Calc total - sums up the chip totals for all selected players. This function does not account for chips in play at live tables, so it is best to use when offline to get an accurate count.
Log balance - writes the current balance for all selected players to the event log. This function does not account for chips in play at live tables.
Register for tournament - this function allows you to manually register the selected players for a tournament. The buy-ins will be deducted from their accounts.
Tokens - Click the Tokens button to display a menu of commands for finding, adding, removing, or setting permission tokens and ticket tokens for all selected accounts.
Lists - Click the Lists button to access emails list (used to send emails to players) and the blacklist (used to ban players).
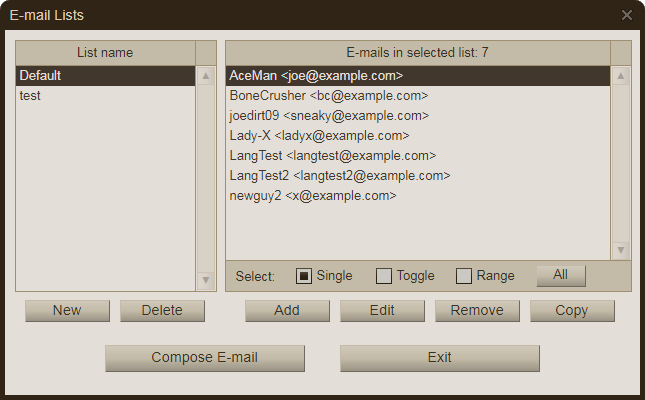
You can create multiple email lists, each with a unique name. Click the "Compose Email Invitation" button to create an email message addressed to all the recipients in the current email list. Poker Mavens will use the SMTP settings that you provided in the System tab to send the outgoing emails. A form will be displayed so that you can customize the outgoing message.

Check the "Send copy to self" box to have a copy of the message sent to the "From" address. To prevent the players from seeing each other's email addresses, set the "Send as" option to either "Separate messages" or "Single message (Blind Carbon Copy)". You can adjust the subject line and the message body as you see fit before sending.
Transactions - Click the Transaction button to query the transaction database (contained in PlayerData.db). This database contains are chip and ticket transactions for every player account if "Log Account Transactions" is enabled in the Database Settings group on the System tab.