This tutorial will help you configure your poker server and get it online quickly.
Assuming you've already installed Poker Mavens on your Windows PC or Windows server, start the Service Manager by double-clicking the "PM 7 Manager" icon on the Windows desktop.
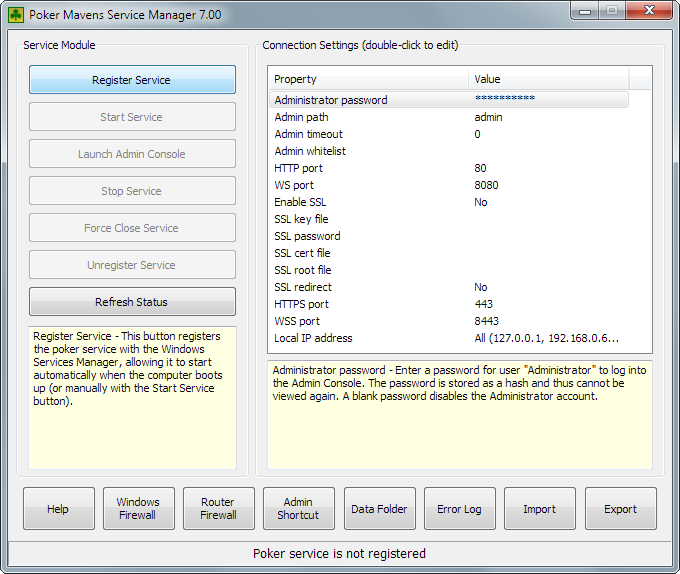
The Service Manager is used to set your administrator password and ports, and to put the service online, making it ready to accept logins to the Admin Console.
Administrator password
Enter an Administrator password by double-clicking that setting in the property list. Pick something long and unguessable as the security of your site depends on it. For extra security, you can change the Admin Path setting from "admin" to something else to prevent hackers from even knowing the entry path.
Ports
If you are not running a separate web server like IIS or Apache then you should leave the default port numbers (80 and 8080) as they are. However, if you are running a web server on the same machine, it will be using port 80 for itself so you will have to choose a different one as your HTTP port. Leave the SSL settings disabled for now (even if you have an SSL cert). You can come back later for those options once you get your site up and running.
Windows Firewall
Windows will automatically block new programs from receiving incoming connections. To remedy that, click the "Windows Firewall" button to display this dialog:
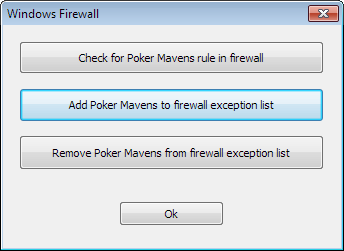
Click the middle "Add" button and then "Ok".
Router Firewall
If you have installed Poker Mavens on a home PC behind a router, that router will block all incoming connections by default. To remedy that, click the "Router Firewall" button to display this dialog:
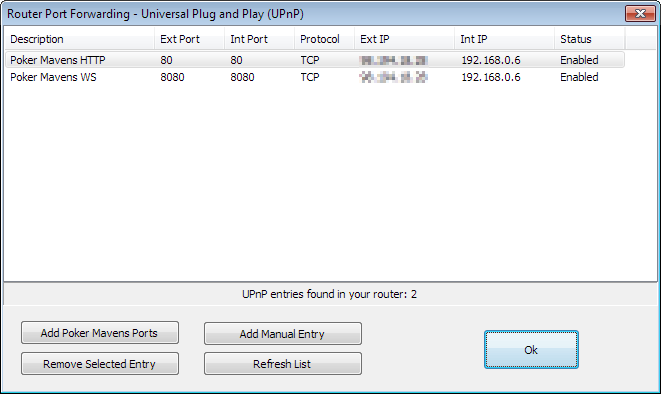
Click the "Add Poker Mavens Ports" button to add the HTTP and Websocket ports to the router's port forwarding list, which lets in connections on those ports and routes them to the PC that is running Poker Mavens. Note that rebooting your PC or router may change the PC's local IP address and break your port forwarding. If that happens, simple delete the old settings and add them again.
If you've installed Poker Mavens on a remote hosting service, you will not have a router and can ignore this step. However, some of the larger services like Amazon AWS may have their own separate firewall and you will need to access your account configuration page on that service to open the HTTP and WebSocket port.
Poker Mavens 7 is compiled as Windows service program, as opposed to a regular Windows application program, as was the case in previous versions. A Windows service program runs in the background on the Windows System account without a user interface and typically starts up automatically during the computer's bootup phase. To start the service, first click the "Register Service" button in the Service Manager and then the "Start Service" button. It should then be ready to accept admin logins.
Click the "Launch Admin Console" button to load your default web browser and point it to the admin login page on localhost (127.0.0.1/admin). 127.0.0.1 is a special "localhost" IP address that tells a computer to connect to itself. The path will be different if you changed the default Admin Path in the settings. Also, the HTTP port number will be appended to the IP if you use any number other than 80 (127.0.0.1:81/admin for example).
Once the poker service has been started, the Service Manager is no longer needed (until you want to stop the service or change any of the settings). Before closing it, you can click the "Admin Shortcut" button on the bottom and that will create a desktop icon for your browser that will load the Admin Console directly.
One note about installing on a remote hosting service running Windows Server 20xx. The version of IE/Edge that comes with Windows Server is very locked down by default and will not make a websocket connection needed to load the Admin Console locally. To remedy that, either install a different browser like Chrome or FireFox (and make it the default browser) or perform the following steps:
After clicking the "Launch Admin Console" button (or using the Admin Shortcut), your default browser will start up and load the Admin Console and display the login prompt:

Enter "Administrator" as the user name and then the password that you entered in the Service Manager. Click Ok.
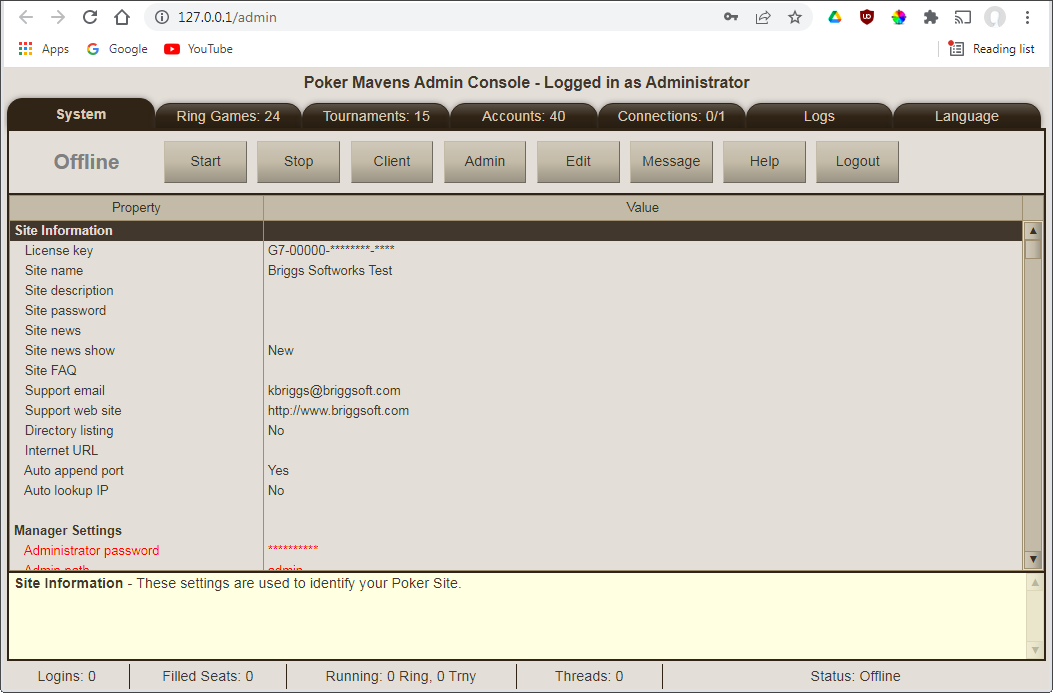
System tab
On the System tab, enter your license key (unless running the Trial version) by double-clicking the first setting. Enter a site name for the second setting. For now, leave the other settings as-is.
Ring Games tab
On the Ring Games tab, click the Add button to add a new ring game. If using the Trial version, double-click the Game setting and change it from "No Limit Hold'em" to "Limit Hold'em" (only limit games are supported in the Trial). Otherwise leave all the defaults and click Ok.
Return back to the System tab and click the "Start" button. That will put the poker server online so that players can connect. Once the gray "Offline" indicator turns to a green "Online" indicator, click the Client button to load the player client into a new browser tab. There you can create an account for yourself. Or create multiple accounts so that you can test the game play with different accounts logged into other browser tabs.
Outside Connections
Once you've put the poker server online, the outside world can connect to your site using your Internet IP address. To see what that is, double-click the "Internet URL" setting in the Site Information group on the System tab. Then click the Lookup button. Or if you have a domain name that points to your IP address, enter that instead. If your HTTP port is anything other than 80, that number will have to be appended to the end of the URL with a colon in between. You can log out of the Admin Console after clicking the Start button and the poker server will continue to run until you log in again and stop it with the Stop button.
If you want your site listed in the directory at www.pokermavens.net then change the "Directory listing" setting to "Yes" in the Site Information group. If you set the "Site password" setting then your site will appear on the Private tab and your players will have to know it to connect. If no one can connect to your site then you likely have a Windows and/or router firewall issue that was discussed above in the Service Manager section.
Local Network Connections
On a home wi-fi network, whether or not you can connect to your own Internet URL depends on if your router supports NAT loopback. Some do and some don't. For those that don't, players on your local network can connect to your Local IP address, which you can see in the Service Manager in the Local IP Address setting (the number that comes after 127.0.0.1) or by clicking the Router Firewall button and looking in the "Int IP" column.
Remote Admin Login
To connect to the Admin Console from a remote location, simply connect to your Internet URL in any browser with the Admin Path appended to the end. Help Index | Home Page